April 4th, 2021 11 Minutes

Starting my journey with GraphQL
Up till now, I've always heavily relied on RESTfull services to power API's, this recently got widened with GRPC which you can read about in my article .NET & GRPC What they forgot to tell you. GraphQL was the third final frontier that needed exploring 🥾...until now.
Having looked at it a year back the implementations for .NET were in their infancy, which meant that your server would only be as good as the framework you choose. Fast forward to 2021, Chilli Creams Hotchocolate has gained some serious ground and makes GraphQL an appealing proposition for developers.
In this article I hope to cover two main points,
- How REST is designed to break backend engineers
- How GraphQL saves the day
Your typical REST scenario
Let's paint the scene, your a backend engineer who's creating an endpoint for showing a list of cats. With your battle-tested REST knowledge, you set out to create your first basic endpoint in the CatsController that returns all cats and the front end engineer is ready to integrate it into his UI.
// api/cats
[HttpGet]
public async Task<IActionResult> GetCats()
{
    using (var context = contextFactory.CreateDbContext())
    {
        var cats = await context.Cats.ToListAsync();

        if(cat != null)
            return Ok(cats);
    }

    return NoContent();
}
The app soon becomes a hit! your product manager decides to expand the functionality to filter by cat descriptions and to create a new cat information page. Getting to work you expand the endpoints for the front end engineers to use.
//api/cats/1
[HttpGet]
[Route("{id}")]
public async Task<IActionResult> GetCatsById([FromRoute] int id)
{
    using (var context = contextFactory.CreateDbContext())
    {
        var cats = await context.Cats.FirstOrDefaultAsync(x => x.Id == id);

        if(cats != null)
            return Ok(cats);
    }

    return NoContent();
}

// api/cats/description/brown
[HttpGet]
[Route("description/{description}")]
public async Task<IActionResult> GetCatsByDescription([FromRoute] string description)
{
    using (var context = contextFactory.CreateDbContext())
    {
        var cats = await context.Cats.Where(x => x.Description.Contains(description)).ToListAsync();

        if(cats != null)
            return Ok(payload);
    }

    return NoContent();
}
The cycle continues with product owners coming up with more feature requests and at the bottom of the pile, you got the backend engineer being reactive to all the changes. By the time you've wrapped up the project your left with a code smell of 10+ endpoints 💩.
The situation further degrades after a year when the UI gets redesigned and features are culled based on user usage. You end up with random floating endpoints because quite frankly no one audits their endpoints for dead code.
This is where GraphQL steps in, it switches the responsibility of an engineer from anticipating and creating endpoints to simply upfront displaying everything that's available with declarative meaning.
Hot Chocolate (.NET GraphQL server framework)
Hot chocolate is one of the leading implementations of a GraphQL server, one important thing to note when choosing a framework is that your implementation will only be as good as the framework you choose. As the GraphQL specification progresses you want a framework that keeps up to date with the changes... Hot Chocolate does that.
To understand the basics of Hot Chocolate I recommend Les Jackson's free course on youtube. It is a bit lengthy at 3 Hours and 45 Minutes but it allows you to create an ASP.NET implementation from scratch and understand basic concepts like Querys, Mutations and Subscriptions. By the end of the course, you have a GraphQL service that can do CRUD actions (do 👍 his video it's great!).
The source code he produces can also be found on his github repo. The source code is a great starting point as it creates a docker image containing an MSSQL database. The solution itself already has Entity Framework and Hot Chocolate bootstrapped, with two entities to test with.
On top of this Banana Cake Pop 🍌 is also integrated which allows you to query your server through a browser (similar to swagger).
As well as GraphQL Voyager 🚀 (do checkout the live demo).
To understand the remainder of the article it's important to have some basic knowledge of Hot Chocolate.
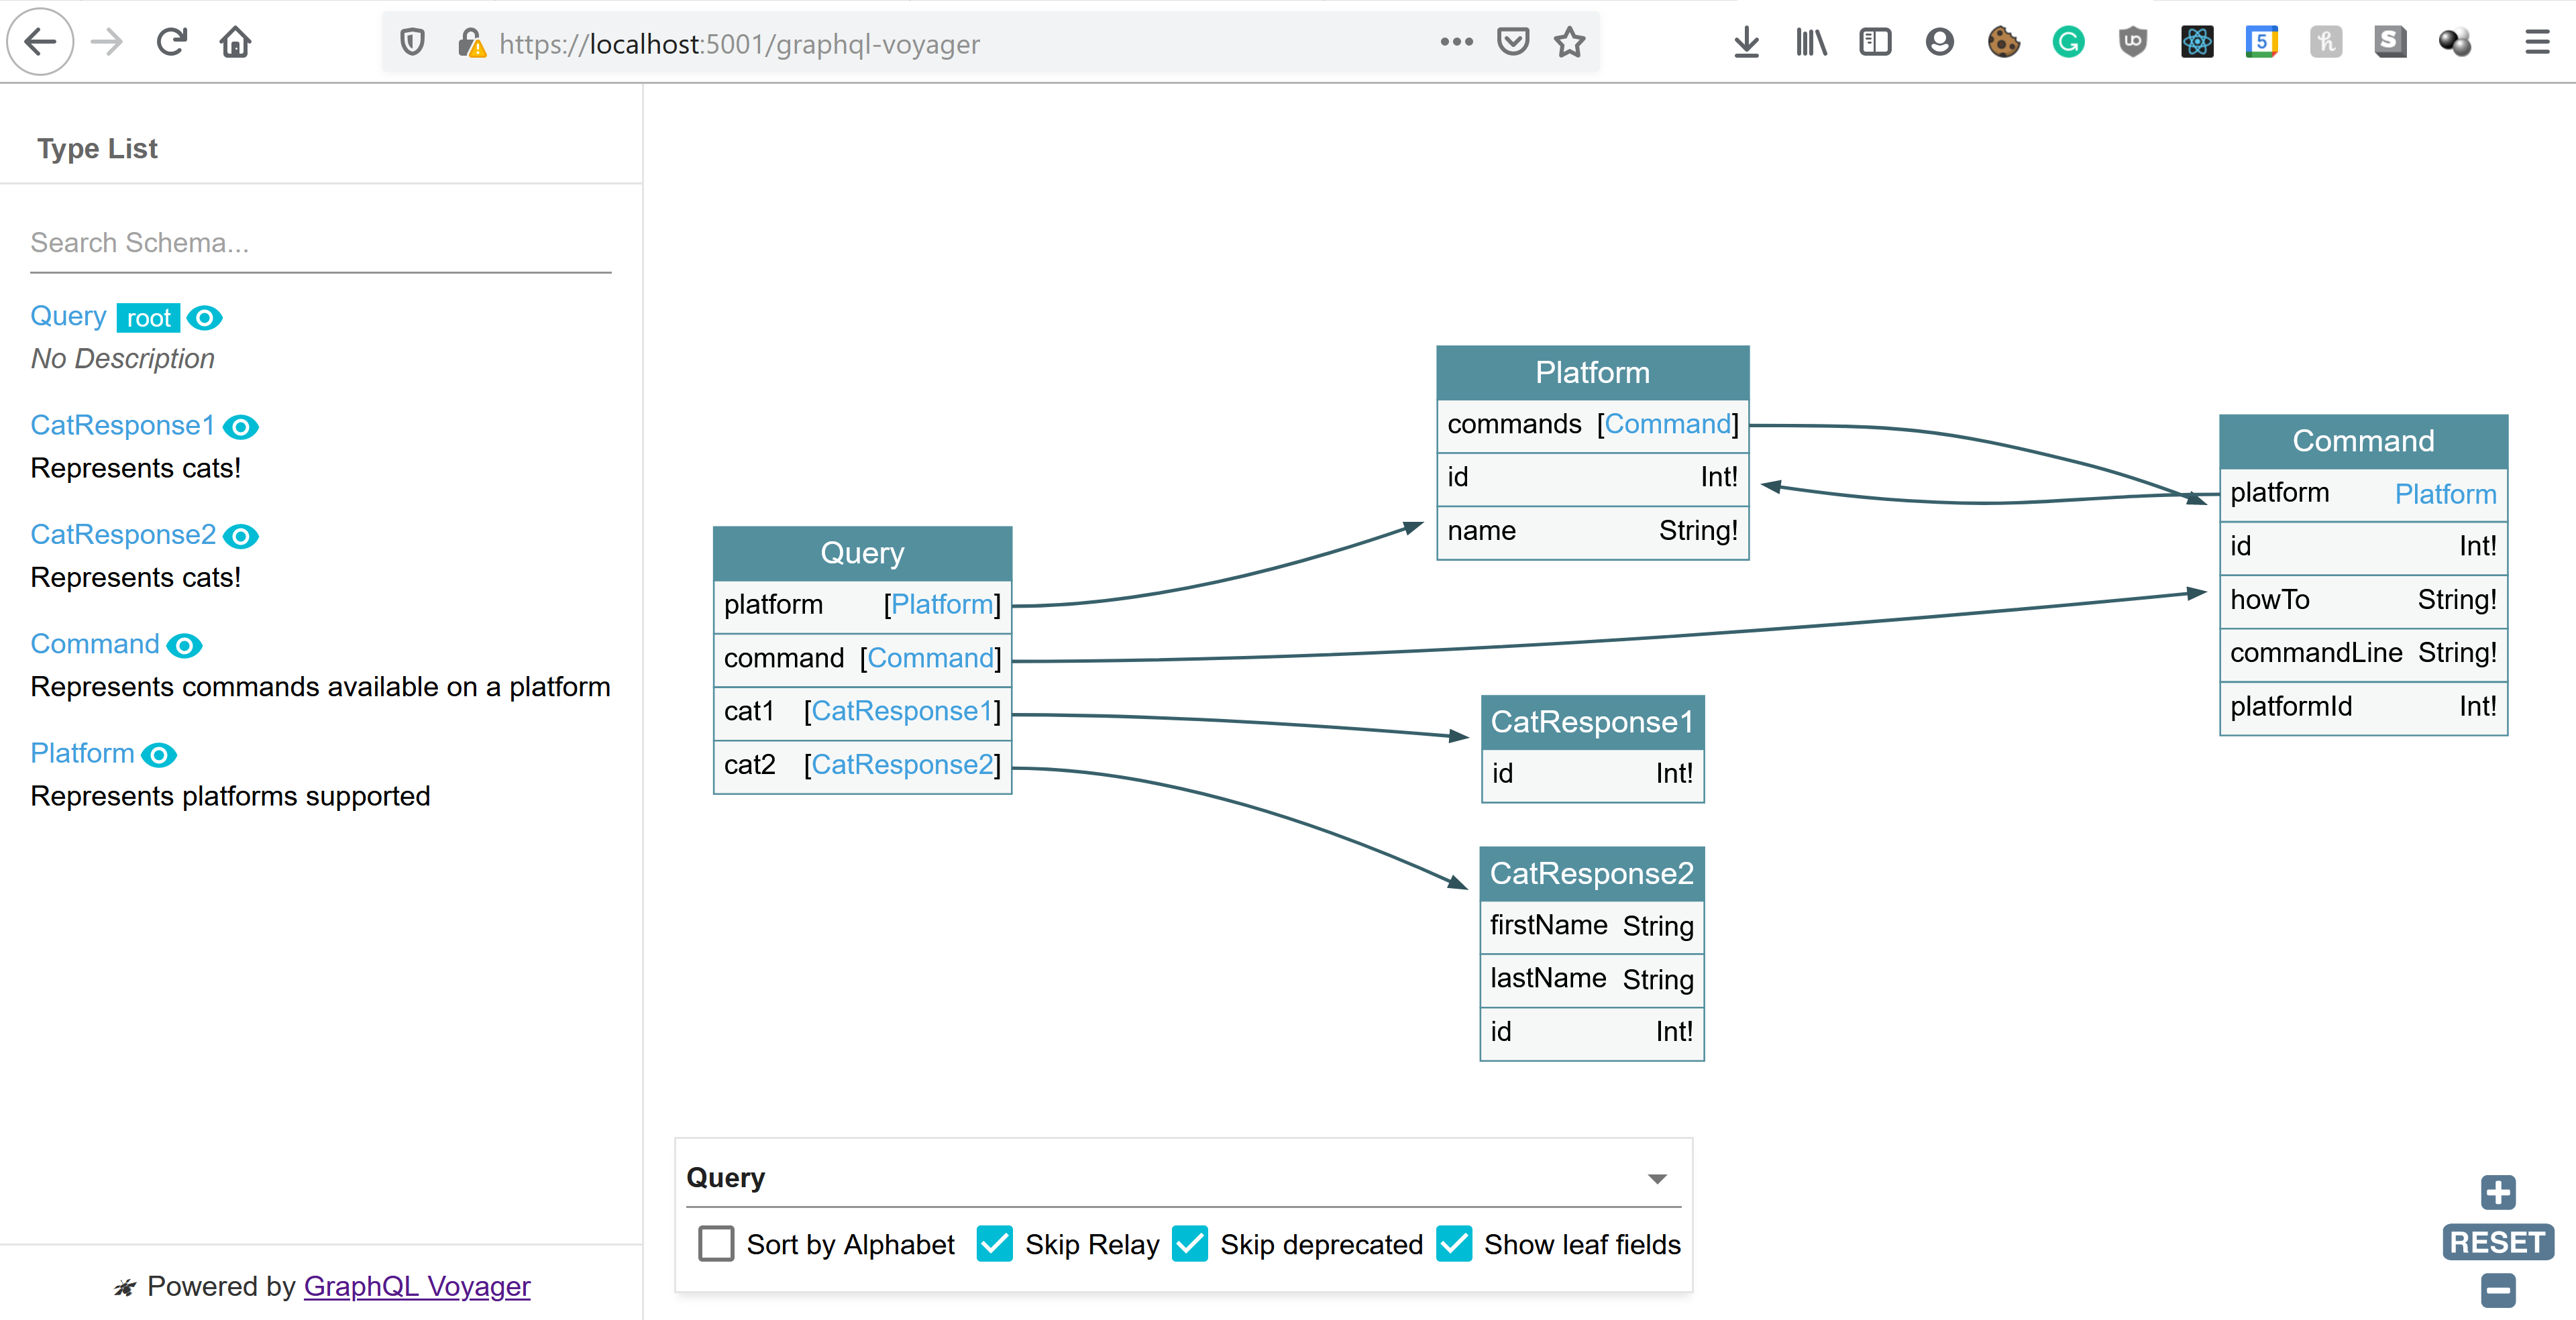
GraphQl Voyager
Whilst this is an addition to what's being discussed, it's worth briefly mentioning. Voyager helps facilitate the move of a backend engineer from creating and documenting prescriptive REST endpoints to simply becoming a harbour of documentation and entities.
The marker of a quality API has shifted from creating a subjectively RESTfull API and how well it's documented to ... just how well it's documented 📝.
Here's a taste of what is looks like for our API,
What they forgot to mention
Up till now what we have discussed fits the 80% CRUD usecase, however as we know API's that are in the wild also deal with a range of other responsibilities. The remainder of this article is to shed some light on how this is done.
How to version your API
The typical versioning strategy for REST is to version using URLs https://api.cats.com/v1 (when developers can be bothered). However with GraphQL as your only ever posting to a single endpoint that strategy is no longer a prefered solution.
While there's nothing that prevents a GraphQL service from being versioned just like any other REST API, GraphQL takes a strong opinion on avoiding versioning by providing the tools for the continuous evolution of a GraphQL schema. Taken from GraphQL Best Practices
Before we begin on how to version, there are some distinct points to note.
Non-breaking changes can continue as they would with REST, adding properties to entities (as you would with response models in REST), continues to be a way to evolve your API. Similarly adding new query types to your GraphQL server is also deemed as a non-breaking change, and is equivalent to adding new endpoints in REST.
GraphQL aids in breaking changes caused due to nullability as everything unless specified is treated as nullable. This leads to upfront resilience on the front end to missing data, the id: Int! in the example below cannot be null.
type Cats {
  id: Int!
  name: String
}
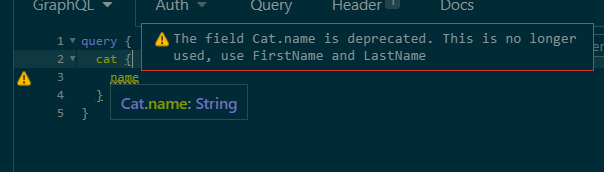
Eventually, we do still hit circumstances where a breaking change is needed. In these situations we have two strategies. The first as Chilli Cream Docs specify is to add deprecated flags to old properties and begin to shift usage to new versions.
public class CatsType : ObjectType<Cats>
{
    protected override void Configure(IObjectTypeDescriptor<Cats> descriptor)
    {
        descriptor.Description("Represents commands available on a platform");

        descriptor.Field(x => x.Name).Deprecated("This is no longer used, use FirstName and LastName");
        descriptor.Field(x => x.FirstName);
        descriptor.Field(x => x.LastName);
    }
}
For client developers, this then creates warnings when using a deprecated property.
Whilst this approach works over time it could create a lot of noise if you have many deprecated properties, an alternative approach is to split the entity entirely, use different classes between the two versions. Here is an example, we start by creating two query types,
public record CatResponse1(int Id, string Name);
public record CatResponse2(int Id, string FirstName, string LastName);
Both of these would contain their own Code First type files
public class CatType1 : ObjectType<CatResponse1>
{
    protected override void Configure(IObjectTypeDescriptor<CatResponse1> descriptor)
    {
        descriptor.Description("Represents cats!");

        descriptor.Field(x => x.Name)
            .Description("Represents the name of the cat")
            .Deprecated("This is no longer used, use FirstName and LastName from Cat2");
    }
}

public class CatType2 : ObjectType<CatResponse2>
{
    protected override void Configure(IObjectTypeDescriptor<CatResponse2> descriptor)
    {
        descriptor.Description("Represents cats!");

        descriptor.Field(x => x.FirstName)
            .Description("Represents the name firstname of the cat");
        descriptor.Field(x => x.LastName)
            .Description("Represents the name lastname of the cat");
    }
}
The final piece of code is to use the intermediary response models. Under the hood we are still using the same EF entity.
public class Query
{
    [UseDbContext(typeof(AppDbContext))]
    [UseFiltering]
    [UseSorting]
    public IQueryable<CatResponse1> GetCat1([ScopedService] AppDbContext context)
    {
        var cats = context.Cats;

        return cats.Select(x => new CatResponse1(x.Id, x.Name));
    }

    [UseDbContext(typeof(AppDbContext))]
    [UseFiltering]
    [UseSorting]
    public IQueryable<CatResponse2> GetCat2([ScopedService] AppDbContext context)
    {
        var cats = context.Cats;

        return cats.Select(x => new CatResponse2(x.Id, x.FirstName, x.LastName));
    }
}
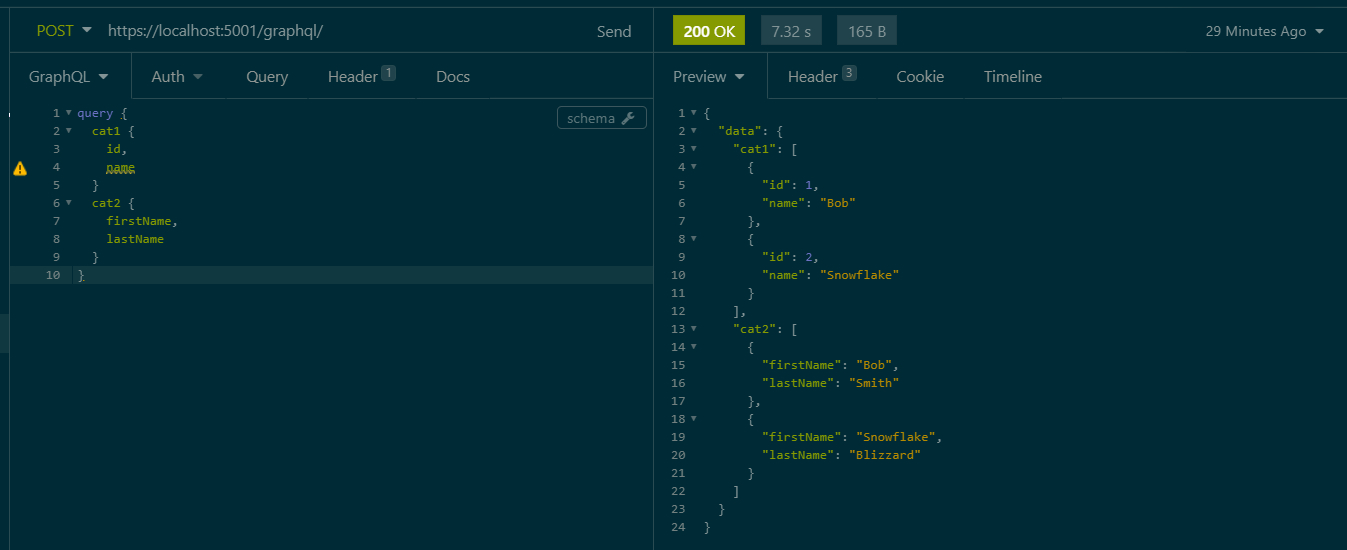
These changes now allow us to split our models, the two can be queried independently.
How to do Authentication
Since Hot Chocolate works on top of ASP.NET we can leverage on all the traditional Authentication pipelines we use for REST, nothing changes! To demonstrate this I'm going to extend the base implementation with a basic authentication mechanism using a header value x-api-key and a key defined in the appsettings.json.
Adding key-based authentication
To begin let's first add basic app settings to hold our authentication key (this represents the key the client will pass to the server to authentication their request), and create a class to deserialise into using IOptions interface.
//Code goes into appsettings.json
"AuthenticationSettings": {
    "AuthenticationToken": "secret123"
}

//New class to serialize into
public class AuthenticationSettings
{
    public string AuthenticationToken { get; set; }
}

//Register the configuration in Startup.cs > ConfigureServices function
services.Configure<AuthenticationSettings>(Configuration.GetSection(nameof(AuthenticationSettings)));
Next we will create authentication scheme options as follows,
public class ApiKeyAuthenticationOptions : AuthenticationSchemeOptions
{
    public const string DefaultScheme = "KeyBasedScheme";
    public string Scheme => DefaultScheme;
    public string AuthenticationType = DefaultScheme;
}
The next part is where the crux of the code is, the AuthenticationHandler is what determines whether the request was correctly authenticated. On a successful attempt, it populates the ClaimsPrinciple.
public class ApiKeyAuthenticationHandler : AuthenticationHandler<ApiKeyAuthenticationOptions>
{
    private const string ProblemDetailsContentType = "application/problem+json";
    private const string AuthenticationHeaderName = "x-api-key";
    private readonly AuthenticationSettings AuthenticationSettings;

    public ApiKeyAuthenticationHandler(
        IOptionsMonitor<ApiKeyAuthenticationOptions> options,
        ILoggerFactory logger,
        UrlEncoder encoder,
        ISystemClock clock,
        IOptions<AuthenticationSettings> authenticationSettings) : base(options, logger, encoder, clock)
    {
        AuthenticationSettings = authenticationSettings.Value;
    }

    protected override Task<AuthenticateResult> HandleAuthenticateAsync()
    {
        if (!Request.Headers.TryGetValue(AuthenticationHeaderName, out var apiKeyHeaderValues))
        {
            return Task.FromResult(AuthenticateResult.NoResult());
        }

        var providedApiKey = apiKeyHeaderValues.FirstOrDefault();

        if (apiKeyHeaderValues.Count == 0 || string.IsNullOrWhiteSpace(providedApiKey))
        {
            return Task.FromResult(AuthenticateResult.NoResult());
        }

        var isMatchingKey = providedApiKey.Equals(AuthenticationSettings.AuthenticationToken);

        if (isMatchingKey)
        {
            var claims = new List<Claim> {
                //Add your claims here
            };
            var identity = new ClaimsIdentity(claims, Options.AuthenticationType);
            var identities = new List<ClaimsIdentity> { identity };
            var principal = new ClaimsPrincipal(identities);
            var ticket = new AuthenticationTicket(principal, Options.Scheme);

            return Task.FromResult(AuthenticateResult.Success(ticket));
        }

        return Task.FromResult(AuthenticateResult.Fail("Invalid API Key provided."));
    }

    protected override async Task HandleChallengeAsync(AuthenticationProperties properties)
    {
        Response.StatusCode = (int)HttpStatusCode.Unauthorized;
        Response.ContentType = ProblemDetailsContentType;
        var problemDetails = new { Information = "Unauthorized" };

        await Response.WriteAsync(JsonSerializer.Serialize(problemDetails));
    }

    protected override async Task HandleForbiddenAsync(AuthenticationProperties properties)
    {
        Response.StatusCode = (int)HttpStatusCode.Forbidden;
        Response.ContentType = ProblemDetailsContentType;
        var problemDetails = new { Information = "Forbidden" };

        await Response.WriteAsync(JsonSerializer.Serialize(problemDetails));
    }
}
The final part need is to register this in our startup class, below are the two bits of code needed. Once we have this in place the [Authorize] tag will work for regular REST requests, any request sent without an x-api-key value of 'secret123' will be rejected. The next step is to see how we replicate this in GraphQL.
public void ConfigureServices(IServiceCollection services)
{
    ...
    services.AddAuthentication(options =>
    {
        options.DefaultAuthenticateScheme = ApiKeyAuthenticationOptions.DefaultScheme;
        options.DefaultChallengeScheme = ApiKeyAuthenticationOptions.DefaultScheme;
    }).AddScheme<ApiKeyAuthenticationOptions, ApiKeyAuthenticationHandler>(
        ApiKeyAuthenticationOptions.DefaultScheme,
        null
    );
    services.AddAuthorization();
}

public void Configure(IApplicationBuilder app, IWebHostEnvironment env)
{
    ...
    app.UseAuthentication();
    app.UseAuthorization();
}
Authenticating a GraphQl Entity
Authentication in GraphQL works by authorizing individual models, to begin we first need to add the HotChocolate Authorization package HotChocolate.AspNetCore.Authorization and enable it in the Startup.cs class, its a one-liner,
services.AddAuthorizeDirectiveType()
Now similar to the [Authorize] tag we use for REST we can enable Authorization in for our individual ObjectTypes by adding a simple descriptor.Authorize() call.
public class CatType1 : ObjectType<CatResponse1>
{
    protected override void Configure(IObjectTypeDescriptor<CatResponse1> descriptor)
    {
        descriptor.Authorize();
        ...
    }
}
Once this has been added making calls without the header will return an unauthenticated result that looks like this,
{
  "errors": [
    {
      "message": "The current user is not authorized to access this resource.",
      "locations": [
        {
          "line": 3,
          "column": 5
        }
      ],
      "path": [
        "cat1",
        1,
        "id"
      ],
      "extensions": {
        "code": "AUTH_NOT_AUTHENTICATED"
      }
    },
    ...
How to do Authorisation
Extending the code to work with Authorization is also a quick change, in this example we will authorize based on the user's role. To begin we will extend our ApiKeyAuthenticationHandler to populate a claim when the authentication key has matched,
var claims = new List<Claim> {
    new Claim("http://schemas.microsoft.com/ws/2008/06/identity/claims/role", "Admin")
};
Next we can pass a list of accepted roles into the ObjectType CatType1, in this example I have intentionally added a role that doesn't exist.
var roles = new string[] { "NotAdmin" };
descriptor.Authorize(roles);
Making a request now will spark an unauthorized error,
{
  "errors": [
    {
      "message": "The current user is not authorized to access this resource.",
      "locations": [
        {
          "line": 3,
          "column": 5
        }
      ],
      "path": [
        "cat1",
        1,
        "id"
      ],
      "extensions": {
        "code": "AUTH_NOT_AUTHORIZED"
      }
    },
    ...
How does logging work
Regarding logging Chilli Cream has created a guide to adding an AddDiagnosticEventListener that's able to trace incoming requests, check out the article Log Your Queries While Building a GraphQL Server. It would be interesting to create an example that's OpenTelemetry compliant... perhaps that's one for another day (this articles getting a bit long 😩).
Conclusion
That's it folks! We've seen that the Hot Chocolate implementation nicely fulfils not just the 80% crud use case but can also deal with the other responsibilities we typically see with our REST services in the wild.