My journey of creating a .NET CLI tool
Why I started building a CLI
As a .NET engineer, I work with Azure storage a lot, its versatility, ease of use, as well as cost makes it a common staple amongst developers. Its application is also widespread from leveraging queues on a basic console app to storing uploaded images from a web application.
Typically as an engineer, I have always interfaced with azure storage using Azure Storage Manager, but as a UI tool, its always been two clicks away from the information I need or was just slow to navigate.
So I ended up taking my destiny into my own hands and built a CLI tool called Az-Lazy.
Packages used when I started
So as with all projects, I started with a shopping list of packages I wanted to use/needed to make a great CLI experience.
1. CommandLineParser
Whilst there are many command parsers on the market, I found this implementation particular nice to use. The end result allows you to to get a command pattern similar to most of the Microsoft dotnet tools, azlazy connection --list.
Defining available commands is as easy as decorating a class with attributes, and the help options for each command is automatically generated for you (azlazy addcontainer --help).
1[Verb("addcontainer", HelpText = "Creates a new storage container")]
2    public class AddContainerOptions : ICommandOptions
3    {
4        [Option('n', "name", Required = true, HelpText = "Name of the container to create")]
5        public string Name { get; set; }
6
7        [Option('p', "publicAccess", Required = false, HelpText = "Options are None, Blob, BlobContainer")]
8        public string PublicAccess { get; set; }
9    }
2. Pastel
Splash of colour is always a sign of a great CLI experience and seeing red or green are key indicators of successful execution of a command. Pastel lets you do exactly that! its got a range of preset vibrant colours to choose from and allows you to easily RGB your console output.
The extension method style syntax is also great and doesn't distract you away from the code.
1"You successfully deleted all your data".Pastel(Color.LightGreen);3. ConsoleTables
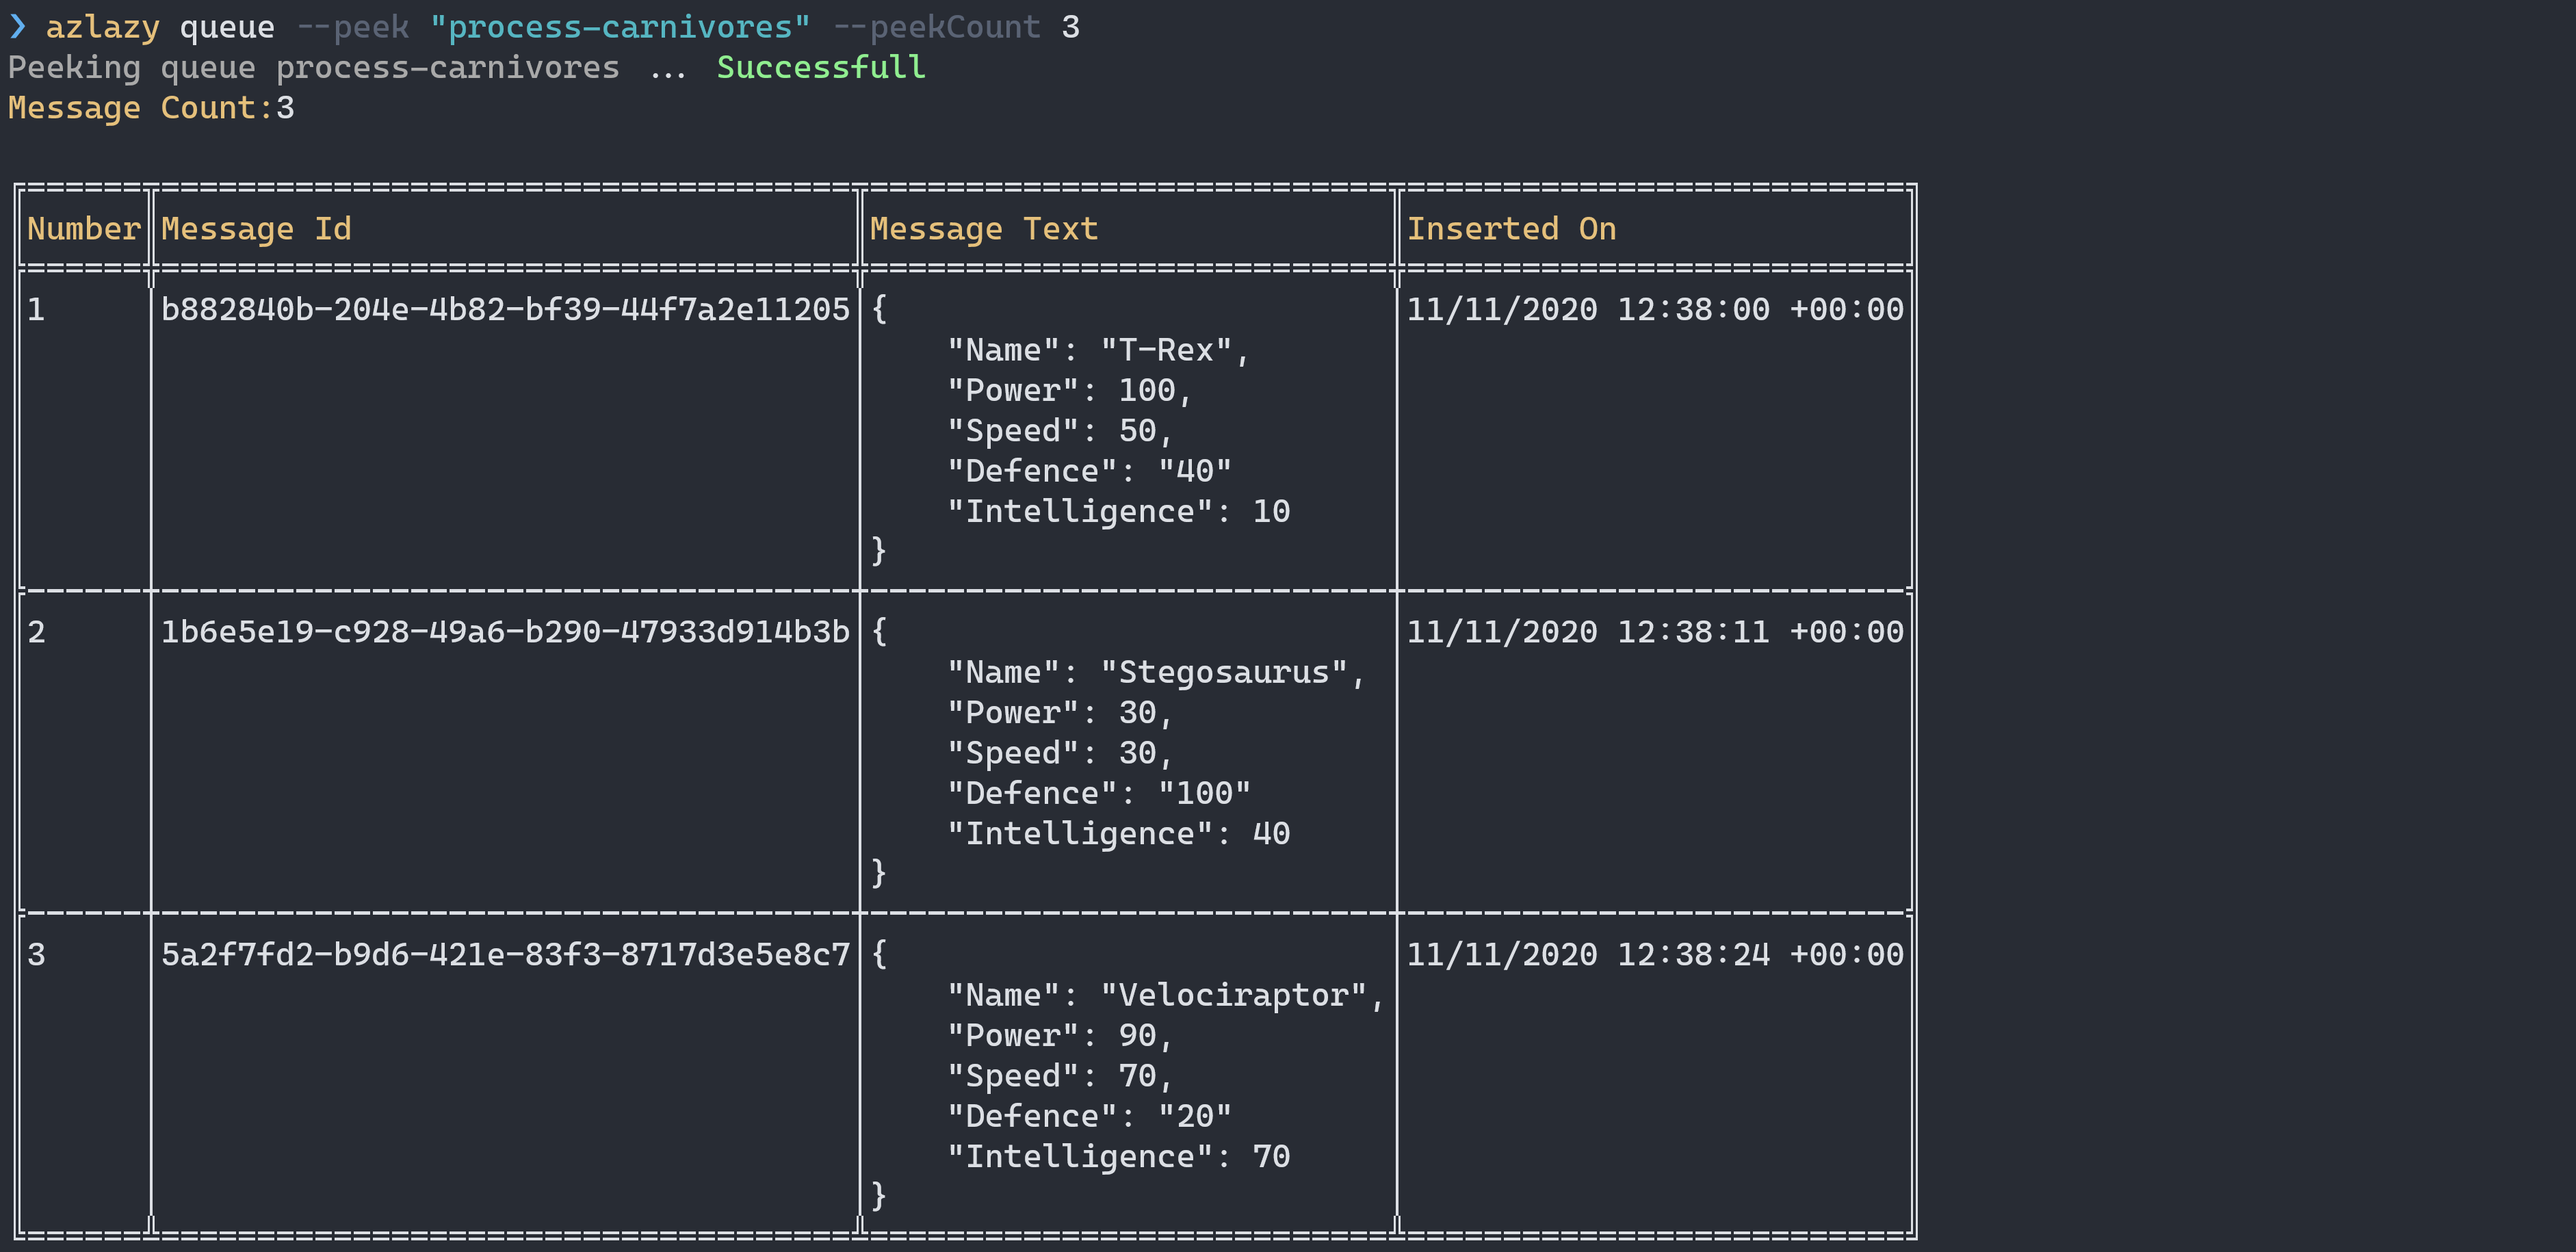
As Az-Lazy deals with table storeage, it was only a matter of time till i needed to output a table to the console. After a quick search on Nuget Gallery ConsoleTables showed up. With a simple minimilist table implementation it was quick to get setup,
1var table = new ConsoleTable("Id", "Blob", "Size");
2table.AddRow(1, "dinopic1.jpg", 300)
3     .AddRow(2, "dinopic2.jpb", 450);
4
5table.Write();
However, I later had to drop this package for something slightly more advanced (Alba.CsConsoleFormat) as I needed to word wrap large cells (particularly when displaying JSON snippets).
4. Alba.CsConsoleFormat
As mentioned above Alba.CsConsoleFormat was a replacement package to render tables. With great options to not only style your table with colours but also specify word wrap options, it was a good choice for rendering large volumes of data.
I did find its syntax a little verbose to work with,
1var headerThickness = new LineThickness(LineWidth.Double, LineWidth.Single);
2
3var doc = new Document(
4    new Span("Dinosaurs #") { Color = Yellow }, Order.Id, "\n",
5    new Span("Type: ") { Color = Yellow }, Order.Customer.Name,
6    new Grid {
7        Color = Gray,
8        Columns = { GridLength.Auto, GridLength.Star(1), GridLength.Auto },
9        Children = {
10            new Cell("Id") { Stroke = headerThickness },
11            new Cell("Name") { Stroke = headerThickness },
12            new Cell("Count") { Stroke = headerThickness },
13            Order.OrderItems.Select(item => new[] {
14                new Cell(item.Id),
15                new Cell(item.Name),
16                new Cell(item.Count) { Align = Align.Right },
17            })
18        }
19    }
20);
21
22ConsoleRenderer.RenderDocument(doc);
Buy my oh my does it produce a great console table 👨🎨
5. LiteDb
One of the requirements of Az-Lazy was to store a list of connections to be reused at any time. Since CLI's don't have any state, I needed a lightweight storage mechanism that can easily ship with the tool.
In comes LiteDb! With its entity framework style CRUD syntax, I really felt at home with this framework,
1// Create your POCO class
2public class Dinosaur
3{
4    public int Id { get; set; }
5    public string Name { get; set; }
6    public int Age { get; set; }
7}
8
9using(var db = new LiteDatabase(@"DinoDb.db"))
10{
11    var collection = db.GetCollection<Dinosaur>("dinosaurs");
12
13    var dinosaur = new Dinosaur
14    {
15        Id = 1
16        Name = "T-Rex",
17        Age = 39
18    };
19
20    collection.Insert(dinosaur);
21
22    var oldDinosaurs = col.Find(x => x.Age > 50);
23}
Since LiteDb stores all its data into one file, from a tool perspective it ensures your not littering your client's computer with files.
Packages used now
1. CommandLineParser
I've still continued to use CommandLineParser however it's starting to hit some limitations, namely nesting of commands. So something like azlazy connection add --name "test" --connection "connectionString" is not allowed.
Whilst this package has been great to get me started, I might start looking at other options as Az-Lazy starts supporting more complex commands.
2. LiteDb
It just works, still happy with this package. Really recommend it for CLI tools!
2. Spectre.Console
Spectre.Console was a big find for me, from the writer of Cake (Patrik Svensson) it's a one-stop-shop for all your CLI needs. Just to name a few of the features,
- Console Colours
- Progress bars
- Tables
- Prompts
- Spinners
After discovering this package I ended up doing a NuGet cull 🪓 which is why this list now stops at 3 (That culls still in progress as I'm removing Pascal for Specters implementation).
I won't go into all the code samples for this, but here are a few, beginning with progress indicators (also note the syntax to colour the output).
1await AnsiConsole.Progress()
2    .StartAsync(async ctx =>
3    {
4        // Define tasks
5        var dinoTask = ctx.AddTask("[green]Uploading dinosaurs[/]");
6
7        while (!ctx.IsFinished)
8        {
9            // Simulate some work
10            await Task.Delay(250);
11            dinoTask.Increment(1.5);
12        }
13    });
Check out how it looks in action, it's great for long-running tasks.

Table's are also strightforward to create,
1// Create a table
2var table = new Table();
3
4// Add some columns
5table.AddColumn("Foo");
6table.AddColumn(new TableColumn("Bar").Centered());
7
8// Add some rows
9table.AddRow("Baz", "[green]Qux[/]");
10table.AddRow(new Markup("[blue]Corgi[/]"), new Panel("Waldo"));
11
12// Render the table to the console
13AnsiConsole.Render(table);
Other great code snippets
The only thing lacking for me in Specter.Console was display a tree structure which is useful for folder hierarchies, (there is an open issue here if you want to show your interest) 🙏.
To fulfil this requirement, I found a great article by Andrew Lock which renders this structure, Creating an ASCII-art tree in C#. Here's what it looks like for me,

Why I chose .NET
So initially I was torn between Node JS and C#, there was an especially compelling article by Twilio outlining how you can create a great CLI experience that was winning me over. They also went so far as suggesting some interesting packages to make use of, here's a snippet of whats comparable with what I used for az-lazy.
- inquirer, enquirer or prompts for complex input prompts
- chalk or kleur for colored output
- ora for beautiful spinners
- boxen for drawing boxes around your output
- stmux for a tmux like UI
- listr for progress lists
- meow or arg for basic argument parsing
- commander and yargs for complex argument parsing and subcommand support
- oclif a framework for building extensible CLIs by Heroku (gluegun as an alternative)
Whilst the NuGet ecosystem is not as diverse as npm, after discovering Spectre.Console, I found that its a one-stop-shop for most of those npm packages mentioned above.
The deciding factor for me however was down to the userbase I was targeting. I figured the majority of my userbase would be more familiar with dotnet than npm, and this solidified the decision. However, whatever platform you choose I believe theres enough packages available to make a great CLI experience.
How to create a .NET CLI tool
This guide shows you how to create a bare-bones .NET CLI tool.
1. Creating a new project
Let's start by creating a new directory and console application.
mkdir barebonesclicd barebonesclidotnet new console- The console app will already come with a standard-issue
Console.Writeline("Hello World");😁
2. Package as a tool
What distinguishes your console app from a dotnet tool is purly the .csproj file. In particular the package as a tool option <PackAsTool>true</PackAsTool>, Id which needs to be unique across all the NuGet packages in the gallery <Id>azlazy</Id> and tool command name <ToolCommandName>azlazy</ToolCommandName>. The full .csproj should look like this,
1<Project Sdk="Microsoft.NET.Sdk">
2  <PropertyGroup>
3    <OutputType>Exe</OutputType>
4    <TargetFramework>netcoreapp3.1</TargetFramework>
5    <RootNamespace>barebonescli</RootNamespace>
6    <PackAsTool>true</PackAsTool>
7    <ToolCommandName>barebones</ToolCommandName>
8    <PackageOutputPath>./nupkg</PackageOutputPath>
9    <Version>1.0.0</Version>
10    <Id>barebonescli</Id>
11    <Authors>Faesel Saeed</Authors>
12    <Owners>Faesel Saeed</Owners>
13    <Title>Demo app to show a bare bones CLI</Title>
14    <Description>This great CLI can greet the world</Description>
15    <Copyright>Copyright 2020 Faesel Saeed</Copyright>
16    <PackageRequireLicenseAcceptance>false</PackageRequireLicenseAcceptance>
17    <PackageLicenseFile>LICENSE.txt</PackageLicenseFile>
18    <PackageIconUrl>https://raw.githubusercontent.com/faesel/barebonescli/main/barebones/icon.png</PackageIconUrl>
19    <PackageTags>barebones greeting cli</PackageTags>
20    <RepositoryUrl>https://github.com/faesel/barebonescli.git</RepositoryUrl>
21    <RepositoryType>git</RepositoryType>
22    <RepositoryBranch>main</RepositoryBranch>
23    <PackageProjectUrl>https://github.com/faesel/barebonescli</PackageProjectUrl>
24    <PackageIcon>icon.png</PackageIcon>
25  </PropertyGroup>
26  <ItemGroup>
27    <PackageReference Include="Microsoft.Extensions.DependencyInjection" Version="3.1.9" />
28    ...
29    <None Include="LICENSE.txt" Pack="true" PackagePath="$(PackageLicenseFile)" />
30    <None Include="icon.png" Pack="true" PackagePath="\" />
31  </ItemGroup>
32</Project>
The Github links are fictional, you can replace them with your project.
To make your package more credible in the NuGet gallery there are other fields you can fill in. For the licence and package icon, you will need to place the files in the same project, the folder structure will look something like this,
barebonescli
- barebonescli.csproj
- Program.cs
- icon.png
- LICENCE.txt
3. Package your CLI
The next step is to create a NuGet package, if you specified a PackageOutputPath in your .csproj you will see the NuGet package in that folder.
- Run
dotnet packon the project
Once executed you should have a barebonescli.1.0.0.nupkg file.
4. Upload your package to the Nuget gallery
- Click on your profile
- Select upload package and upload the nupkg file
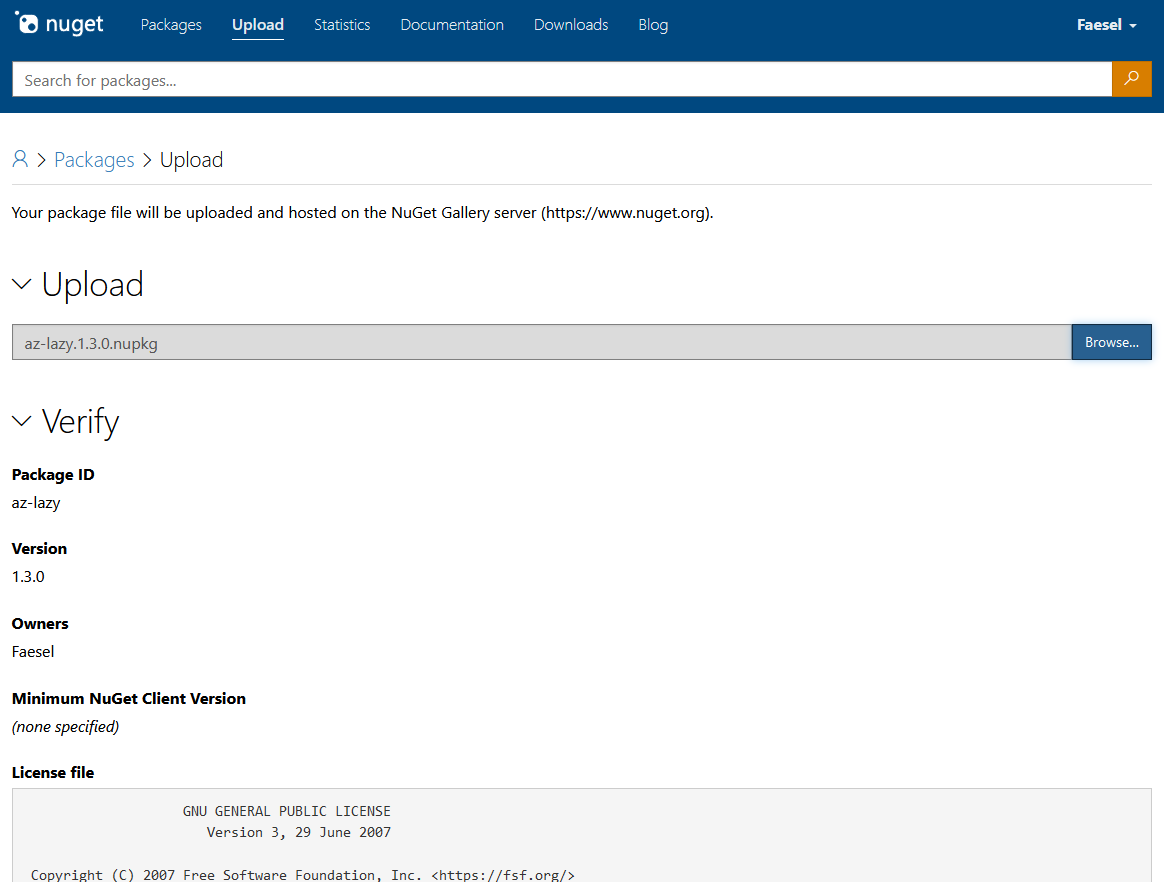
You could also alternatively use the CLI to push with nuget push barebonescli.1.0.0.nupkg
Once uploaded it will be ready to install as soon as its indexed, dotnet tool install --global barebonescli --version 1.0.0 😎
From here the packages mentioned in this article can help you create a professional-looking CLI.
More about Az-Lazy
If you're interested in checking out Az-Lazy, you can install in with the command,
dotnet tool install --global az-lazy
Usefull links
Do checkout Nuget Must Haves command-line tagged package list, there's some great options in there that are not mentioned in this article.
Comments